
YaYa’s in the Kitchen: Pumpkin Cream Chocolate Towers
Category : A Day in the Life of This SLP , Blog , YaYa's in the Kitchen
First Fall Recipe 2017
It is that time of year when we remember that fall is on the way.
While there is a collective exhaustion from Hurricane Irma passing through last week, it is time to resume our routines.
Today that means selecting a pumpkin recipe. However, pumpkin bread will have to wait as there is an oven on the fritz.
Hmmm, what are a YaYa and her assistant to do?!
Search for a recipe that does not require baking, of course!
Recipes that can be made without baking are often preferred as the product can be tasted sooner, and what child (or adult) really likes to wait?
The Recipe Which Inspired Us
This Center’s recipe was inspired and adapted from Lisa Huff, Snappy Gourmet’s No-Bake Pumpkin Chocolate Chip Cake.
Our Plan
Before we start, we develop a plan together.

YaYa explains I can make changes once we begin, but we need a plan to get started. Photo: CCC/LSG
Our Recipe Modifications
It was renamed by my assistant in honor of his stacking and building using cookies for the towers. Each tower was built for a specific person . While most were four cookies tall, some were more and some were less.
For our second modification we chose to top the towers with more pumpkin cream not plain whipped topping.
Our last design option change was inspired by all things garnish. See below in the ingredient section.
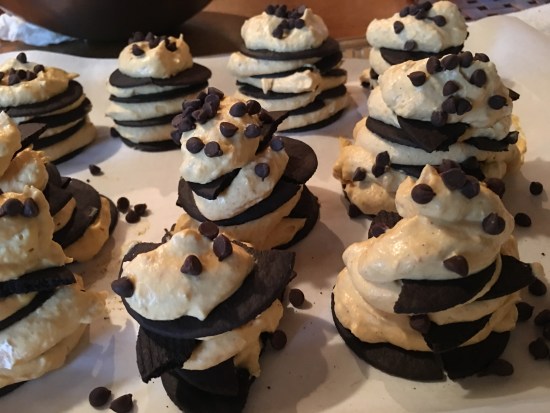 Pumpkin Cream Chocolate Towers Photo: CCC/LSG
Ingredients
- 8 ounces of softened cream cheese
- 1 can of 100% pumpkin (not pie filling)
- 1/4 to 1/2 cup white sugar (try using half light brown and half granulated sugar)
- 1/2-1 teaspoon vanilla extract (optional)
- 1/2-1 teaspoon of cinnamon (or a combo of fall spices such as allspice, pumpkin mix, ginger, nutmeg, etc.)
- 2 cups of thawed (previously frozen) whipped topping
- Chocolate wafer cookies, often found near the ice cream but might in the cookie aisle
- Toppings for garnishing the towers
- Mini, regular or jumbo chocolate morsels or chips. Choose the chocolate (dark, milk, semi-sweet, white etc.) you prefer or use a variety
- We used semi-sweet mini chips.
- Other topping options we considered: sprinkles, chopped nuts, and shredded coconut (try it toasted).
Directions
- Allow your cream cheese and whipped topping to soften for easier blending.
- Using a wooden spoon and/or hand mixer, beat the cream cheese until smooth and creamy.
- Add in the can of pumpkin, sugar, vanilla, and spices you have selected.
- Mix thoroughly
- We stirred by hand after each addition of an ingredient and then we used the hand mixer on low to make it extra creamy and smooth.
- Gently stir (or fold in) in the whipped topping until it is all blended.
- Folding is a gentle method similar to stirring which preserves the whipped aspect of the ingredient being added to the heavier based. Here is a video by Martha Steward to help you understand this process.
- Prepare a work tray with parchment or wax paper and make room for it in your refrigerator for chilling upon completion.
- Line a row of cookies, spoon on pumpkin cream, add another cookie and press gently and continue for the number of cookies per tower.
- You can make a row at a time or one tower at a time.
- Top with more pumpkin cream and garnish.
- You can eat the crunchy towers now, or put them in the fridge and the cookies will soften and change consistency.
Our Pictorial Sequence
We believe that looking at our pictures as you share the activity is a helpful way to introduce the directions with your little one BEFORE you start.
You can also watch our video on our Facebook page. If you can’t find it on our page, go here.

YaYa says it is great fine motor practice opening the glued box of cream cheese and then pulling the foil apart. It looked like a zipper! Even better because I was able to plop it into the bowl without getting “creamed”! Photo: CCC/LSG

Setting the mixer on low prevents splashing. I like that YaYa and I can hold it together and keep the cream cheese in the bowl! Photo: CCC/LSG

A hand can opener allows for more fine motor skill use, remember to have the adult take the sharp lid off before scooping! Photo: CCC/LSG

Wooden spoons work easily and then a spatula for the last little bit in the can. Photo: CCC/LSG

Let the mixing begin… Photo: CCC/LSG

A final quick blend on low to get the remaining lumps creamed into the mixture. YaYa helps me steady the mixer so it doesn’t fall into the pumpkin cream! Photo: CCC/LSG

Blending in the whipped topping. YaYa says, I will be able to hand whip cream soon! Photo: CCC/LSG

WOW! This looks delicious… Photo: CCC/LSG

Building our towers and then sprinkling mini chocolate chips on top is fun! Photo: CCC/LSG

I am happy and proud! Photo: CCC/LSG

YaYa can’t resist a comparative… I am happier and prouder! Photo: CCC/LSG

Or, having me use superlatives! Happiest and proudest! Photo: CCC/LSG
The Importance of Being Flexible
- When selecting the cookies, this Speech-Language Pathologist, aka YaYa, examined the three available boxes at the store.
- The box selected did not have any visible broken pieces while the other two boxes were noticeably broken. Nor did the chosen box rattle to indicate broken pieces.
- However, upon opening the cookies during our activity we noticed that…
- All, and I do mean all, of our chocolate cookies were broken, so our tower building included “gluing” the first layer with cream and then either gluing other layers or staggering broken pieces on our towers.
- This added bit of flexibility works well for all children and adults and allows for problem solving and extra creativity.

How to use broken cookies and still be successful! Photo: CCC/LSG
Language, Literacy & Learning Tips
As a pediatric Speech-Language Pathologist, each activity is filled with goals and objectives for each “friend”.
At home you should gear each activity to the appropriate level for your child/ren, have fun, and enjoy!
Where to begin…well, at the beginning…
- Review a plan, draw pictures for non-readers, outline the steps, use the recipe to help your little one know what to expect. Sequencing is important!
- Key words: First, second, then, next and last
- Line the ingredients up left to right to follow the sequence of your directions. This allows for visual cues. Remove items as they are added to increase clarity.
- Encourage your child to ask questions for clarification and give him/her time to think and wonder.
- Allow for pauses before you cue or prompt, but do not make this a test, it is meant to be creative, delicious and a positive social family activity.
- Today, with my friend, we focused on How and Why questions (again, adjust to your child’s age and language level).
- How do we get the mixer to work? (plugs, sockets, electricity, safety)
- How do we use the can opener?
- Why don’t we touch the can lid?
- How do you get the pumpkin out of the can once it’s open?
- Why do you need to use both hands for the opener, the blender, when mixing?
- Why are all of the cookies broken?
- How can we use the broken cookies?
- How does each ingredient taste, feel, smell?
- And on and on…
As always, this kitchen science activity was a success!
Learn more about YaYa’s in the Kitchen by looking through our previous recipes and the first posts outlining how YaYa started this program.
As always, contact us to learn more about how your child might benefit from our SLP services.
A sweet (almost) fall day in the life of This SLP,
Lori (YaYa)